Dutch Oven or Crock Pot Pulled Pork

Dutch Oven Pulled Pork….so yummy!

I think dutch oven cooking is fun okay? It is a LOT of work when you are camping, but it is simply fun to watch the pots covered with coals do their thing. And kids love dutch oven stuff. It’s a great family “making memories” time. I would do it in the backyard on a cookie sheet if I don’t like to camp.
But if you don’t like outdoor cooking, try some pulled pork from the crock pot. Either one is really so delicious.

Tools for Dutch Oven Cooking…..
Pork Ribs we bought from Costco….So we didn’t have to pull apart the meat….they are cut already so they just fall apart in the cooking process….

Just dry rub and season with salt, pepper, garlic and onion powders and some brown sugar….

Here are 3 recipes for dry rub. Take your pick. Each makes about a cup of dry rub. 

  • 2 tablespoons salt
  • 2 tablespoons sugar
  • 2 tablespoons brown sugar
  • 2 tablespoons ground cumin
  • 2 tablespoons chili powder
  • 2 tablespoons freshly ground black pepper
  • 1 tablespoon cayenne pepper
  • 1/4 cup paprika
Dutch ovens come in all sizes. I have 2 of the  12 inch sizes which are most popular. 
OR
  • 1/3 cup paprika
  • 1/4 cup sugar
  • 3 tablespoons black pepper
  • 2 tablespoons salt
  • 2 teaspoons dry mustard
  • 2 teaspoons cayenne
  • 1 teaspoon white pepper
Lid Lifter for the dutch ovens…you will really NEED one of these…..
OR
You can see the fire ring has the coals in a big pot to use for the ovens…..
  • 1/4 cup paprika
  • 2 tablespoons salt
  • 2 tablespoons onion powder
  • 2 tablespoons fresh ground black pepper
  • 1 tablespoon cayenne

Here is My recipe. It tastes sweet more than spicy …it makes about 1/2 cup of rub which is enough for my family. You can double it. 

1/4 cup brown sugar
1 1/2 Tablespoon Seasoning Salt (Lawry’s or Johnny’s)
1 teaspoon Chili Powder
1 teaspoon  Black Pepper
1 teaspoon Onion Powder
11/2 teaspoons paprika
Rub it all over dry ribs and let them sit 1/2 hour before cooking. Add a little bit more brown sugar ( 1/3 cup) and the rest of the dry rub an hour before you want to serve them by pouring it on top of the cooked pulled pork. I love Cattlemen’s BBQ sauce over my ribs and Famous Daves Sweet and Sassy Sauce too. I would choose one of those to have on hand when the pulled pork is done.

Lodge Dutch Ovens are a very good brand. Check out my KITCHEN STORE at the top of my blog if you want some  Dutch Oven tools and cooking products. They are ones that I have in my kitchen and home. 
Dutch oven OR crock pot….pulled pork can be done either way. 
Pour a 1/4 cup of oil into your pot to start and then add the pork in 1 layer. Add dry rub if you haven’t already. Then put the top on and add your coals to the top and bottom. I think most cooks will do dutch oven meats for around 3 hours.  It is like cooking them in a slow cooker crock pot. You can also DO this in a crock pot for more like 5 hours.  Either way they fall off the bone. 

We had dessert in one, potatoes with bacon and cheese in another and  pulled pork in another. The top one was just for looks. So cute, right? Dutch oven dinners are fun to do. The holder to the left is another way to put coals down for the first dutch oven. But they are really expensive.  Another way is to use a dutch oven stand. 
These are expensive and not as necessary unless you plan on doing it a lot. But they do keep the wind out of your dutch oven and the ashes out of your food! 
Use a charcoal tower to light up the coals. When they are just gray on each of the 4 edges they are ready to go. Layer about 12 underneath and 10 on top depending on your size of pot. I like the 12 inch pots. Lodge is a great brand if you want to buy one.

You can also do dutch oven in the oven with one of these  9.5 quart Dutch Ovens. But they are VERY expensive.

SEASONING YOUR NEW DUTCH OVEN 
Be sure to “season” it before using a new one. It will come with wax in the bottom of the pan. Scrape it out and wipe with a paper towel. Rub just a tiny bit of Wesson oil on the inside and outside surfaces with a rag or paper towel. Then put the lid on one rack and the pan on the other. Let it bake for an hour and a half on 450.  It will smoke your kitchen up so be prepared and open windows or your smoke alarm will go off!!  When the smoking is all gone, it is seasoned and should look more black than grey. It will continue to get seasoned as you cook with it.  Don’t ever wash dutch ovens with soaps! Just rub it out with warm water and reoil it a tiny bit before you put it away or it may rust. Always let it air dry or oven dry before storing.

A close up of our finished pulled pork from a Dutch Oven.  Boy I wish I had some right NOW!! 
When they are done, pull the pork out of the pan and leave some of the sauce in the pan so you don’t douse your rolls with too much liquid. Add the bottle of your favorite BBQ sauce to the pork. Then serve in a foil pan or large casserole dish and keep covered. Here are our finished pans of pulled pork from a Dutch Oven. 
Don’t you want a bit of delicious Dutch Oven Pulled Pork? Buy some soft sub rolls or sandwich type rolls and add pulled pork and maybe some extra bottles of BBQ sauce on the side. So decadently Yummy either from a crock pot or dutch oven, they are both wonderful! 

Dutch Oven Desserts

Well doesn’t this dutch oven dessert look like a keeper? Yummy. We were doing a youth activity and we made dinner for a few hundred kids last Thursday. This was the dessert recipe. It is made with yellow cake, caramel ice cream topping, sweetened condensed milk, chocolate chips and pecans.
I really loved this idea. Some guy had these dog tags on all of his dutch ovens. He and his sister who are great big campers had them attached to each and every lid and pot they had. You could really tell from a distance which dutch ovens were theirs.  

 But I didn’t have those on mine and everybody’s pots looked the same once you all got cooking. So this guy had a set of alphabet letter metal stampers and a bunch of washers and wire. He punched your initials into the washer and then laced a piece of wire through the washer and attached one to your lid and one to your pot handle. I could see my initials even after we were all done cooking for the day. Ingenious!

We were feeding a big crowd so the coal starter was really big, but you could go small and use those little chimney style coal starters too. Then you use your small shovel to add a few coals to the bottoms and tops of the dutch ovens when they are slightly gray on each of the corners.  That tells you they are ready to go!  

The first 3 drawers of the massive kitchen gadget drawers for camping trips.  The gal that owns these had both sets of 3 drawers pulled together with a nylon belt used for securing things in truck beds.  I loved it.  Really it was the best! 

 I took a picture of this gal’s 6 drawers and all the gobs of gadgets that were packed inside.  If you are a die-hard camper like she is, you would LOVE having this kitchen away from home!!  I was thinking I would do a smaller 3 drawer version of this. It is way nice to have all your gadgets an arm’s length away!

Tools you will need to do dutch oven cooking. There is a shovel, lid lifters, long handled spoons, charcoal lighter and the charcoal briquettes. And of course a few dutch ovens!! I cut off the fireplace shovel but you could bring a smaller garden shovel too. Just be sure it has a long handle so you don’t burn your arms. 
This camping box was so organized!  The gal that had this camping box also has 40 dutch ovens. She has made this her life hobby. I got a lot of tips from her.  

This is how we layered our dutch ovens for cooking.  We had a main dish (pulled pork) a side dish (cheesy potatoes with onions and bacon) and a dessert (chocolate caramel cake with pecans) and the cute little one on top was strictly for looks. Isn’t it cute?  These were positioned inside of this coal pot (pictured to the left). You could also put them right on the cement if you wanted, or in a stand up oven. 
You can see the ovens on the stands here.  We must have had 12 dutch ovens going here.  It was a big meal. 

 We first mixed up the yellow cake mixes and put them in an oiled dutch oven.

 We cooked the cake mixes in oiled dutch ovens for about 15 minutes. You can see the coals on the tops of the ovens.  Then after 15 minutes we added the toppings. In these desserts it was a can of sweetened, condensed milk, and a can of caramel ice cream topping.  Then we added another cake mix over the top and baked for 15 more minutes.  Then we opened up each oven and added chocolate chips and pecans for a topping and let them melt for 5 or so minutes.  Finished!

Ladies, do you want to taste test these?  Uh…..do you even need to ask?  No you don’t!  Give me a bite! 
Here is the dessert almost done, we took a look and we needed that milk incorporated into the cake a bit more…..
It sure does look good now, doesn’t it?  Give me that whipped cream!  

Chocolate Chip Pecan Caramel Cake
2 packages yellow cake mix mixed according to package directions
1 can sweetened condensed milk
1 small jar of caramel ice cream topping
2 cups chocolate chips
1 1/2 cups pecans 


Mix cake mixes. Pour half into an oiled 16 inch dutch oven. Bake for 15 minutes. (8 coals on bottom, 12 on top). Open up and add the condensed milk and the caramel in wavy lines over cake. Make 4-5 small slice lines through cake. Then cover again and Bake 10 more  minutes. Open and top with chocolate chips and pecans. Bake another 10 – 15 minutes or until golden. 

Here are some other easy recipes to try next time you do dutch oven cooking!  Cobblers are really easy and you really can’t go wrong with them.


EASY Apple or Cherry Cobbler
2 cans apple or cherry pie filling
1/4 cup brown sugar
1 pkg. buttery yellow cake mix
1 cup pecans; chopped
1 cup (2 sticks) butter

Spread 2 cans of apple or cherry pie filling in a 12” oiled, Dutch oven. Sprinkle the sugar, then cake mix, then pecans over apples. DO NOT STIR. Slice thin the 2 sticks of butter and layer over top. Bake at 350 (8 coals on bottom 12 coals on top) for 45 minutes to 1 hour, replacing coals as needed. (you can also use blueberry filling). 


Raspberry Swirl Cake
1 cn Raspberry pie filling (large)
1 Yellow cake mix
3 Eggs
 7up or lemon lime soda instead of water in the mix
1 stick of melted or softened butter (for the oil)

Mix cake following directions using some 7up instead of water for the liquid and butter for the oil. Mix it up and add  eggs. Pour in oiled dutch oven and bake for 15 minutes (8 coals on bottom and 12 on top).  


 Mix pie filling and 1/2 can of 7up and pour in dutch oven. Carefully pour raspberries (with 7 up) over the top ( do not mix). Cook 15 to 20 more minutes checking with a toothpick after 15 minutes.  Serve cake topped with  whipped cream. You can use other pie fillings with this. 


Have fun dutch oven cooking on your next camping trip! Or just try it in your backyard. You can do it on pea gravel or on cement or on a large cookie sheet even.  Have fun with your dutch ovens! I just ran out and bought another one!!! 

Cherry Cheesecake Squares

i love THIS DESSERT!  iT IS SO CREAMY, LIGHT AND SWEET FOR SUMMERTIME! i MAKE 2 OF THEM IN 9 x 9 inch SQUARE PANS AND TOP EACH ONE WITH A DIFFERENT FRUIT TOPPING, OR I make 1 WITH CHOCOLATE PUDDING ON TOP.  iT IS ALSO GOOD WITH STRAWBERRIES IN STRAWBERRY GLAZE. yUM! 

Yummy Cheesecake squares

Cherry Cheesecake Squares
Crust:
3/4 cup real butter, softened (1 stick and a half)
1 1/2 – cups all purpose flour

1/4 cup white sugar
3/4 – cups pecans, chopped


Filling:1 – 8oz pkg cream cheese
1 1/4 – cups powdered sugar
1 1/4 cups Cool Whip
 

1 – (21 oz) can cherry pie filling 


 (OR 1 Large package instant chocolate pudding mixed as pie recipe on box
 OR fresh strawberries in strawberry glaze for variety in toppings)

The crust for Cherry Cheesecake Squares is really yummy, like a crescent cookie…crunchy and rich...

Make the crust by mixing the butter and flour till you get pea sized bits. Add sugar slowly while mixing. Then add chopped pecans.  Press mixture into the bottom of a 9 x 13 inch pan or two 8 x 8 pans if you want to freeze one. Bake at 350 degrees for 18-20 minutes or until light golden brown.

Cherry  cheesecake squares

Use cherry pie filling for the topping on these cream cheese squares…or use strawberries with strawberry glaze in the summer if you want fresh fruit!  Both are really yummy and everybody will GOBBLE it right up! It is a hit at a pot luck too! 

While the crust is cooling mix the filling.   Mix the cream cheese and powdered sugar together using a electric mixer. Add Cool Whip to cream cheese mixture.


You can also make this in a 9 x 13 and it is just a little thicker dessert.  I like to do it this way so I can top it two different ways for variety. 

 The cream cheese mixture is soo yummy on these cream cheese squares…it’s fun to lick the bowl! The crust layer tastes like a crescent cookie with pecans inside. Really buttery and flaky.

 When the crust is completely cooled I add the cream cheese filling on top of the crust and spread evenly. Then I top that with cherry pie filling OR chocolate instant pudding and refrigerate for a few hours until it sets up.
This is a wonderful, refreshing dessert….cherry cheesecake squares….

OR Chocolate  cheesecake squares….either one is a favorite of mine….
Chocolate  cheesecake squares….mmmmm….
 Yummy layers of rich, creamy sweetness!


 Chocolate  cheesecake squares….same recipe, just different toppings….I just used mini hershey bars and Hersheys kisses and a paring knife to make the chocolate curls on top of Cool Whip.

Top it with some chocolate pudding, Cool Whip and some chocolate curls for garnish…or a strawberry! (That weird pink thing is my finger under the plate, lol…. looked like an alien or something on the plate!! EEK! 

I brought this to a BBQ today for my little 2 year old granddaughter’s birthday party. 
She is such a sweetie!  She loved her little tea set and Brown Bear, Brown Bear book and her Winnie the Pooh cake and balloons.  So sweet. 

Grandma and Josie hanging out at her Birthday Party! She still has a little shiner
from falling down at the docks at Lake Powell last week. She’s a tough cookie though…. 

Chocolate Cheesecake Squares

I made this yummy dessert today for my little granddaughter’s birthday party. She just turned 2. It is quick and easy and great for a potluck or dessert bar in the summertime. 

Recipe for Chocolate Cheesecake Squares

Crust:
3/4 cup real butter, softened (1 stick and a half)
1 1/2 – cups all purpose flour

1/4 cup white sugar
3/4 – cups pecans, chopped


Filling:1 – 8oz pkg cream cheese
1 1/4 – cups powdered sugar
1 1/4 cups Cool Whip
1 Large package instant chocolate pudding mixed as pie recipe on box

( OR fresh strawberries in strawberry glaze OR 1 – (21 oz) can cherry pie filling for variety in toppings) 

Chocolate cheesecake squares….mix up the crust in the mixmaster…..super quick and easy…..

Make the crust by mixing the butter and flour till you get pea sized bits. Add sugar slowly while mixing. Then add chopped pecans.  Press mixture into the bottom of a 9 x 13 inch pan or two 8 x 8 pans if you want to freeze one. Bake at 350 degrees for 18-20 minutes or until light golden brown.

                                Here is the crust ready for baking…..

While the crust is cooling mix the filling.   Mix the cream cheese and powdered sugar together using a electric mixer. Add Cool Whip to cream cheese mixture. 
When the crust is completely cooled add the cream cheese filling on top of the crust and spread evenly. 

The cheesecake filling is really easy and quick but rich and creamy and yummy….


Top with cherry pie filling OR chocolate instant pudding and refrigerate for a few hours till set. You can also just do this recipe in a 9 x 13 pan and choose 1 topping only. 

Make chocolate curls to top your pie pieces with by slicing off slivers of a hershy bar  or chocolate kiss with a paring knife. Keep the chocolate cold or it will melt up when you try to cut the curls…..
After cutting the Chocolate cheesecake dessert into squares, top each with a dollop of whip cream and some chocolate curls…
Doesn’t it look good enough to bit into right NOW?  Everything is better with a little chocolate…..
Here is the cherry cheesecake dessert…It looks pretty good too!  Or you could top with fresh strawberries and glaze…. I like to make two 8 x 8 pans with this recipe, so I can have 2 toppings for people to choose from. 
I brought these chocolate cheesecake squares to my little 2 year old granddaughter Josie’s birthday party today…..

  Here is my son helping his little 2 year old daughter blow out her candles…. Now isn’t that just the sweetest thing you’ve ever seen?  Sniff….
Grandma and Josie at the party…………………..
I usually make this recipe in two 8 x 8 pans and then I can do a different topping on each one. Those who prefer fruit can have the cherry pie filling or strawberries with glaze. Either way it is a great dish for a pot luck or a dessert bar.  Yummm……

Easy Chocolate Eclairs

Yummy cream filled Eclairs….with chocolate fudge icing…..

My French born sister-in-law Danielle makes these TO DIE FOR ECLAIRS every year at 4th of July. Everyone has come to expect and love her chocolate eclairs. She actually can’t make a different dessert because everybody looks forward to these 4th of July Eclairs so much! Or they’d be great for FATHER’s DAY too!

My sis-in-law made the eclairs…..I made the fruity, chocolate cupcakes….both look great on our 4th of July table don’t they? 

Easy Eclairs Recipe:  
1 cup water
1/2  cube butter
1 cup flour
4 eggs
Heat oven to 400. Heat water and butter to a rolling boil. Stir in flour untilmixture forms a ball. Remove from heat. Let cool a bit till batter is not hot. Beat in eggs one at a time. Drop dough 1 Tbsp size onto baking sheet using a pastry bag. Mine were about 1 3/4 inches oval x 1 1/2 and I got about 30 little eclairs.

Cook until puffy and golden. I did 14 minutes at 400 and then turned oven down to 350 for 5 minutes. I think from posts I read on other blogs 20 minutes is perfect for smaller eclairs. Larger ones about 20 minutes at 400 and 4 minutes at 350 but watch them the last 3 minutes. Your oven might be different as I am at high altitude.

    Directions

    Heat water and butter till boiling. Add flour and stir constantly until mixture is smooth.
    The ingredients for cream eclairs are only 4….so easy! 
    Water, butter, flour and eggs….
    Batter before adding the eggs…..I let it beat a little to let off some of the steam….
    Then I added 1 egg at a time and beat for a minute in between eggs…..
    The eclair batter is  like pudding…
    I piped the batter onto a cookie sheet covered with parchment paper….
    I added a blob of eclair batter to each of the 4 corners…then pressed the parchment paper on top. It helps
    “glue” the paper down to the cookie sheets. 
    Here are my finished Eclairs….just out of the oven! 
    Now they are ready to fill with the creamy, rich pudding filling….each one was a half a handful ! 

    Cool. Cut a slit in the side of puff with a knife. Fill eclairs with a pastry bag filled with the french vanilla pudding mixture.  Make chocolate icing and spread over top.  Keep refrigerated. Makes 12 large or 24 eclairs (mine made 30 little round ones- bigger than the Costco size) I think this is a perfect dessert to bring to a party because if you have other desserts, this can be a side garnish and they are so cute and yummy too.

    French Vanilla Cream Filling
    1/2 pint whipping cream (smallest carton)
    1 small box instant French vanilla instant pudding
    1/2 cup milk
    Whip until thick.

    HERE is a link to a yummy eclair recipe from Annie’s Eats if you like mocha flavor.

    1/2 cup milk, pint of cream and small box of french vanilla instant pudding….

    The filling is really rich and creamy too…I had to pop an eclair in my mouth to taste test it! 

    Squeeze inside of your little puffs….so easy! 

     Chocolate Fudgy Glaze
    1/2 slick butter
    2 Tbsp. cocoa
    2 Tbsp. milk
    2 cups powdered sugar ( I used a little less, just add it till desired consistency)

    Heat until melted, stirring constantly-add 2 cups powdered sugar until melted. Shake a fork
    back & forth and then the other way to ice tops of eclairs if you want a cool design. Or just frost with a knife.

    This was the most delicious chocolate glaze!  

    It was easy and quick….
    And it tastes like the most divine fudge!  Really!
    Chocolate Eclairs….oh my yum! Wouldn’t these eclairs be cute with at little flag sticking out on a toothpick? I saw some at Hobby Lobby the other day….shoulda bought them now that I think about it…..
    Wouldn’t you love a creamy chocolaty eclair bite?  That’s what I’m talkin’ about!  

    Chicken Fettuccine Alfredo

    I was in the mood for Italian. I had leftover whipped cream from a strawberry shortcake my daughter-in-law had brought over. So I decided to make some Alfredo sauce over chicken and pasta! 

    Chicken Alfredo Pasta 
    Chicken Alfredo Pasta….sooooo yummy!

    • 4 Tablespoons butter (in fry pan)
    • ½ tsp Lawry’s or Johnny’s Seasoning Salt
    • 1/2 teaspoon garlic salt or mince a medium garlic clove into the fried onion
    • 1/4 cup finely minced onion fried in the butter with the garlic clove)
    • 1/3 cup grated parmesan cheese
    • 1 ½ cup whipping cream
    • 1 Tablespoon all-purpose flour

    • 2 Tablespoon white wine

    • ½ tsp cracked black pepper
    • a few shakes of chopped parsley (add it to the top of finished dish)
    • 1 1/2 cups diced chicken breast (can use a rotisserie chicken diced up)
     1 package ziti or fettuccine pasta boiled and drained


    Dice up the onion and clove of garlic and fry up with the butter. While those are cooking mix all the other incredients in a saucepan over low heat.


     Add the onion and garlic with the butter when onions are caramelized. Sauce should be thickened with the flour. Season a bit more to taste.

    Mix up the cream, butter, onions, and cheese and then season while on low….
    Add the alfredo sauce to the al dente pasta noodles….
     The alfredo pasta tastes as decadent and delicious as it looks….not low in calories though

    Boil noodles of your choice and drain. Add chicken diced up to the noodles. Top with sauce. Add the chopped parsley over the top at the end. 

    I served my chicken alfredo pasta with baby carrots and garlic bread…and a side salad….
    It’s one of my hub’s favorite meals…..

    Add broccoli florets or spinach and some sliced baby carrots and pine nuts to the mix and it makes one of my favorite Italian dishes from Tucci’s Italian! Or just add the chicken and it is simply divine. 

    Southwest Chicken Salad with Cafe Rio Tomatillo dressing

    At school the other day for Teacher Appreciation Week, we were served a yummy Southwest Salad. Everybody was gobbling it up. It had the southwest fillers like black beans and corn and the tortilla strips and red onion and red pepper, and it had this yummy dressing that made it soooooo delish.

    My finished SOUTHWEST SALAD! yUmMy! The cilantro lime dressing on top is icing on the cake! 
    Cilantro, lime, jalapeno, and tomatillos make up the yummy, green, creamy dressing we call Cafe Rio Tomatillo Salad Dressing . 

    HERE is a link  to the yummiest salad dressing you’ve ever eaten. It is the Cafe Rio cilantro lime creamy ranch dressing for their salads. I love it so much I can eat it on anything from fresh carrots to baked potatoes. I stop short of just drinking the stuff.

    I didn’t have ranch dressing packets on hand so substituted ranch dip instead….it wasn’t as flavorful….use the dressing packet for SURE! But these Santa Fe flavored tortilla strips were sooooo yummy on top of the Southwest Salad! 
    Cafe Rio’s Cilantro-lime-tomatillo salad dressing….super yum. 
    Cafe Rio’s Creamy Cilantro-lime-Tomatillo Dressing
    Source: Sheri Denney

    Ingredients:

    1 (1 ounce) package Hidden Valley Ranch Dressing mix
    1 cup buttermilk
    1 cup Mayo
    1 large or 2 small tomatillos (they are green and by the tomatoes)
    1 clove garlic, minced
    1/2 bunch cilantro, chopped
    1/2 teaspoon lime juice
    1/2 to 1 small jalapeno, seeds removed 


    Chop veggies fine, throw ingredients in the blender and Mix together and then refrigerate. The dressing gets spicier the longer it is kept in the fridge. 

    I threw the ranch mix in with the buttermilk and mayo and diced up the  1/2 jalapeno (remove the seeds for sure!) since
    I don’t like my dressing too hot. More jalapeno, the hotter and spicier it gets. 
    Then I peeled the tomatillo and chopped it up. 
    Then threw it in the blender too along with the chopped cilantro.
    I chopped them all up and blended it in my blender. 

    I absolutely LOVE this Cafe Rio cilantro lime salad dressing…..it’s my new fav. 

    I cut up all my veggies to start….then added a can of drained black beans and  white corn

    SOUTHWEST CHICKEN SALAD
    3 Cups romaine lettuce
    cherry tomatoes sliced in half 
    1 small avocado diced
    1 cup or small can of Niblets white corn (or frozen white corn) 
    1 drained can of black beans
    1/4 cup sliced and diced red onion
    1/4 cup red pepper diced (optional) 
    1 1/2 cups diced rotisserie chicken cubed up (optional)
    spicy tortilla strips on top to taste

    Southwest Salad….Here it is before the tortilla strips and dressing were added……

    Also you could add some diced white chicken breast meat, or a rotisserie chicken diced up from the market to make it a whole meal!

    Oh Heavenly yum, I could eat this salad with the Cilantro Lime dressing for days…..and I DID!   

    Soft Pretzels

    Today I went shopping with my daughter and granddaughters.  We had a yummy snack at the pretzel shack in the mall. Their soft pretzel bites and pretzel dogs (mini pigs in a blanket) were soooooo yummy I had to come home and make some!

    Here’s my yummy soft pretzels! 
    Soft Pretzels took some time but were easy to make, and VERY light and soft. 

     I found a recipe from Smitten Kitchen HERE.  She adapted her recipe from Martha Stewart’s. Then I looked at 3 more recipes and read comments for about an hour. Then I looked up recipes on the Food Network and All Recipes.com.  I chose this recipe because of all the positive comments. It is from the FOOD NETWORK. It is Alton Brown’s recipe and there was also a video. The link is HERE.

    Then I watched a few you tubes on pretzel making and Martha Stewart had a video too. Those are THE BEST ways to learn how to cook something! You tube videos!! I adapted this one after making it.  My recipe has a little more sugar and less salt. And I did not bake mine as long. I like them lighter and soft, not hard on the outside so I added DOUGH ENHANCER POWDER.

    My dough mixed up and ready to cover…..

     Mix the warm water and sugar and then sprinkle on the yeast packet. Let it sit until it is foamy. They call that “proofing” the yeast, it will take 5 minutes. Then add the salt and melted butter and put your dough hook on your mixmaster. Add a cup of flour to start. 

    Add the rest of the flour and some dough enhancer.  Knead for a few minutes.  
    The Dough Enhancer makes bread softer and doughier. You can get it from Bosch bread making supply store.  They were easy and yummy and kinda fun! 

    Soft Pretzels (my recipe adapted from Alton Brown)
    1 package instant dry yeast
    1 1/2 cups warm water
    1 1/2 teaspoons granulated sugar
    1 1/2 teaspoons salt
    4 Tablespoons melted BUTTER
    1 teaspoon dough enhancer (optional for softer pretzels)
    4 1/4 cups all purpose flour
    Mix, knead, let rise for an hour, then roll out and make your pretzels. Place on parchment paper on cookie sheets and bake for 6 to 7 minutes at 425 degrees.

    Now we are ready to roll the pretzel dough out…..it has puffed up quite a bit….
     Always use less flour to start on any bread recipe. Then slowly add in by cupfuls.  This dough was smooth, not really very sticky at all. 

    Then place dough ball in an oiled pan and cover for an hour to let it rise. Then I rolled it out on my surface.  Make a big rectangle shape. My dough was about 1/2 inch thick, maybe a little less. 
    I rolled pretzel dough  into a rectangle…..
    Get your pizza cutter and cut the dough down the middle, then 2 more times to make 4 sections. Then cut each section into 3 or 5 strips, depending upon how large or small you want your pretzels. 
    Cut Soft Pretzel Dough into 4 sections with a pizza cutter, and then cut each section into 5  skinny strips….to make 20 pretzels.

    If it is for a party I recommend the 5 strips. This will give you 20 good, 3 inch bite sized pretzels. If you do the larger (palm sized thick pretzels) 3 strips will make 12 big and soft 5 inch pretzels. 

                                Here were my ingredients….and my cute new RACHEL RAY PAN! It is oval, and orange, with a soft, rubber handle and with a pour spout. SO CUTE right? I love her stuff! I got it on sale at J. C. Pennys! Only $15 bucks and I had a 20% off coupon if I opened a charge (yes I’m a sucker for a coupon!). 

    (Mix a bath of 5 cups hot water to 1/3 cup baking soda in a deep fry pan. Set on warm on stove for after pretzels are made and formed.) 
    I mixed up the baking soda and water hot bath….left it on low on the stove and then formed my pretzels….
    They take less than a minute each in the hot water bath…just like a bagel!
    I played with my dough making all kinds of shapes….it would be so fun for kids to do too! 
    Roll it, flip it twice around, then turn each end up and pinch…
    To roll them I made a long snake, 12 to 16 inches long, and then make make a loop, then twist it once again and take the tails and flip them up to the round loop and press them down. Then I turned each one over. 
    Soft Pretzels.   That’s it!  
    Then drop them in the baking soda and hot water bath….just for like 45 seconds each…
    Pick pretzels up with a slotted spoon and place on a cookie sheet with parchment paper on it..
    More playing with soft pretzel dough….lol…..
    Oh boy is this fun! I got about 3 cookie sheets full…About 20 pretzels….


    Top each pretzel with a sprinkle of kosher salt before baking. (not much, or too salty!)
    Sprinkled on the salt….
    Then ready to bake! 
    Bake in 425 oven for 5 1/2  to 71/2  minutes. Watch them as each oven is a little different. My top shelf cooked them faster than my bottom shelf too, so I had an extra minute on the lower shelf of pretzels.
    Here they are just hot out of the oven….soft and yummy….If you like them hard on the outside just do an egg wash and cook them a bit longer in the oven…they will have a stiffer, smooth and chewy outside…..
    Add the melted butter on with a silicone brush….
    When they come out of the oven brush them with melted butter and a silicone brush. EAT! They are lightly crisp on the outside and buttery chewy inside. Yummy! The hubs loved them! He loves anything salty. 
    Oh yeah….that’s what I’m talkin about!  I brought them to my classroom the next day
    for our little cast party….we are doing 4 little fairy tale plays….I brought O.J. to go with them…yum! 
    Dip them in chili, or light cream cheese, or cinnamon and sugar or just plain. Next time I’ll try putting a 1/4 slice of hot dog inside each one and make pretzel dogs! That would go great with mustard. mmmm………

    Garlic or Dill Chip Dip

    Today in my classroom was Student of the Week.  It is the day to “share” something about yourself.  I have the kids write a giant newspaper article about all their favorite things. Then they have to “teach” the class something.
    We have had everything from dry ice bubbles to learning all about a live hen.  One girl taught everybody some gymnastics tricks.


    But today we had little Morgan teach us a yummy chip dip called “The Great White Moby Dip”.  It was delicious and very easy, only 3 ingredients;

    1 container cottage cheese
    1 brick of 8 oz. cream cheese
    5 to 6 shakes of Garlic Salt (or dill weed for a dilly dip)
    Blend together and refrigerate for an hour

    RUFFLES® Original Potato Chips

    It was enjoyed by all.  Next time I have company over it’s gonna be my go to dip. And I bet all of the students had really yummy breath when they went home!  mmmm…..

    A Funny Mother’s Day Story

     I thought I would share one of my near and dearest stories of being a mom. NOT!  It happened one night when I was President of a church organization called The Stake Primary. It was helping with 7 church organizations for the children 3 to 11.  I was holding a board meeting down the street at a friend’s home who was on my board.

    Busy church activities sometimes took over my life…sometimes.

    I knew I would only be gone a little over an hour and my husband was on his way home from work. I called him and he assured me he would be home by 7:00.  So I left my 11 year old daughter Tiff in charge at about 10 minutes till, but forgot, (excellent mom that I am) to give her the phone number. I just didn’t think it would be an issue. I left the kids playing with play dough and with plenty of snacks and took off.

    Me on a much better day…

    Little did I know how wrong I would be. About an hour later I got a call from a neighbor Terry, down the street. She said the words no mom wants to hear, “Pattie, I don’t want to alarm you, but you better get home right this minute!” and she didn’t tell me why. I jumped in the car and tore home (about 2 blocks). As I turned my corner my eyes  met with  police cars, lights flashing, paramedics, and the fire department all in my driveway. And no cars of ours there.

    And just about every neighbor in my entire neighborhood standing out on their front lawn wondering where in the heck the parents were and what terrible disaster had struck inside the house while those no good parents were gone who knows where!

    When I got there I ran inside with my heart in my stomach, praying all was well. I met a fireman that goes to my church and asked him what had happened. It is comical now, but at the time, not so much.  My 4 year old had put some of the playdough in his ear and the kids tried getting it out. When they couldn’t they called 911 to ask how to get playdough out of somebody’s ears.

    Yeah. A real emergency, playdough in the ears. I couldn’t even believe it.  I learned later that my 11 year old daughter had told the police, “My mom is at a church meeting.” So the officer had taken her in his squad car down to my church and paraded around asking where I was.  Yeah. I know.  Not just my neighborhood was I toast, but now also at church. Complete humiliation!  It was a really bad night for a mom, as you can just imagine.

    The funny part comes later when all the hoopla had left my house. I had pulled all the curtains. The kids had gone to bed and I was sitting in the dark crying, my happy go lucky husband shows up. He’d forgotten HE ALSO had a church meeting. He was a high counselor in our church and also had a 7:00 pm meeting he’d forgotten AND neglected to tell me about. So he simply went straight to his meeting leaving me in the dust.
    The next day was Halloween. Yeah. I remember trick or treating through my neighborhood THAT year.

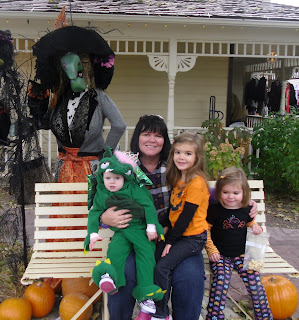
    At Halloween this year with my 3 granddaughters….MUCH more fun! 

    So I guess, time + crisis = humor, as they say. I can laugh about it now, but it was probably my worst experience as a mom. But as all moms know, there are a multitude of stories, almost equally awful, that we could substitute, am I right? I can tell you with complete conviction, looking back, it is ALL WORTH IT.

    Cuz look what I got! 

    My family is the best, most important thing in my life.  Enjoy them while they are little. It goes so quick. Happy Mother’s Day to all who mother, whether it is your own kids or others, we all honor you today. For all the highs and all the lows, for all the laundry, the meals, the parent-teacher conferences, the doctor visits, the Scouts, music lessons, laundry, PTA meetings, sports, taxiing,  homework you helped with and Birthday parties you planned. It’s your day to shine!  Happy Mother’s Day!

    The college grad playdough pusher…..yes I’ve gotten over it…it took a lot of therapy…….just kidding. Who could afford therapy?….I had good friends. And that’s the best a mom can ask for.