Kitchen Gadget Organization

I was in my friend Amy’s kitchen the other day and asked her if I could snap a few pictures of her cute holiday decor. When I got home I loved all of her stuff. She is a master designer and decorator. Her projects always inspire me.
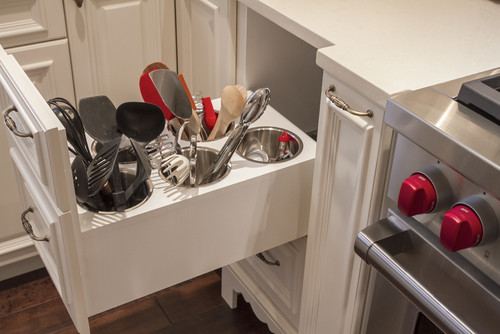
But the picture that really got me dreaming was this one I took of her stove area. She is a great cook and party planner too. But I had no idea she had so many little kitchen gadgets! Look at this display!

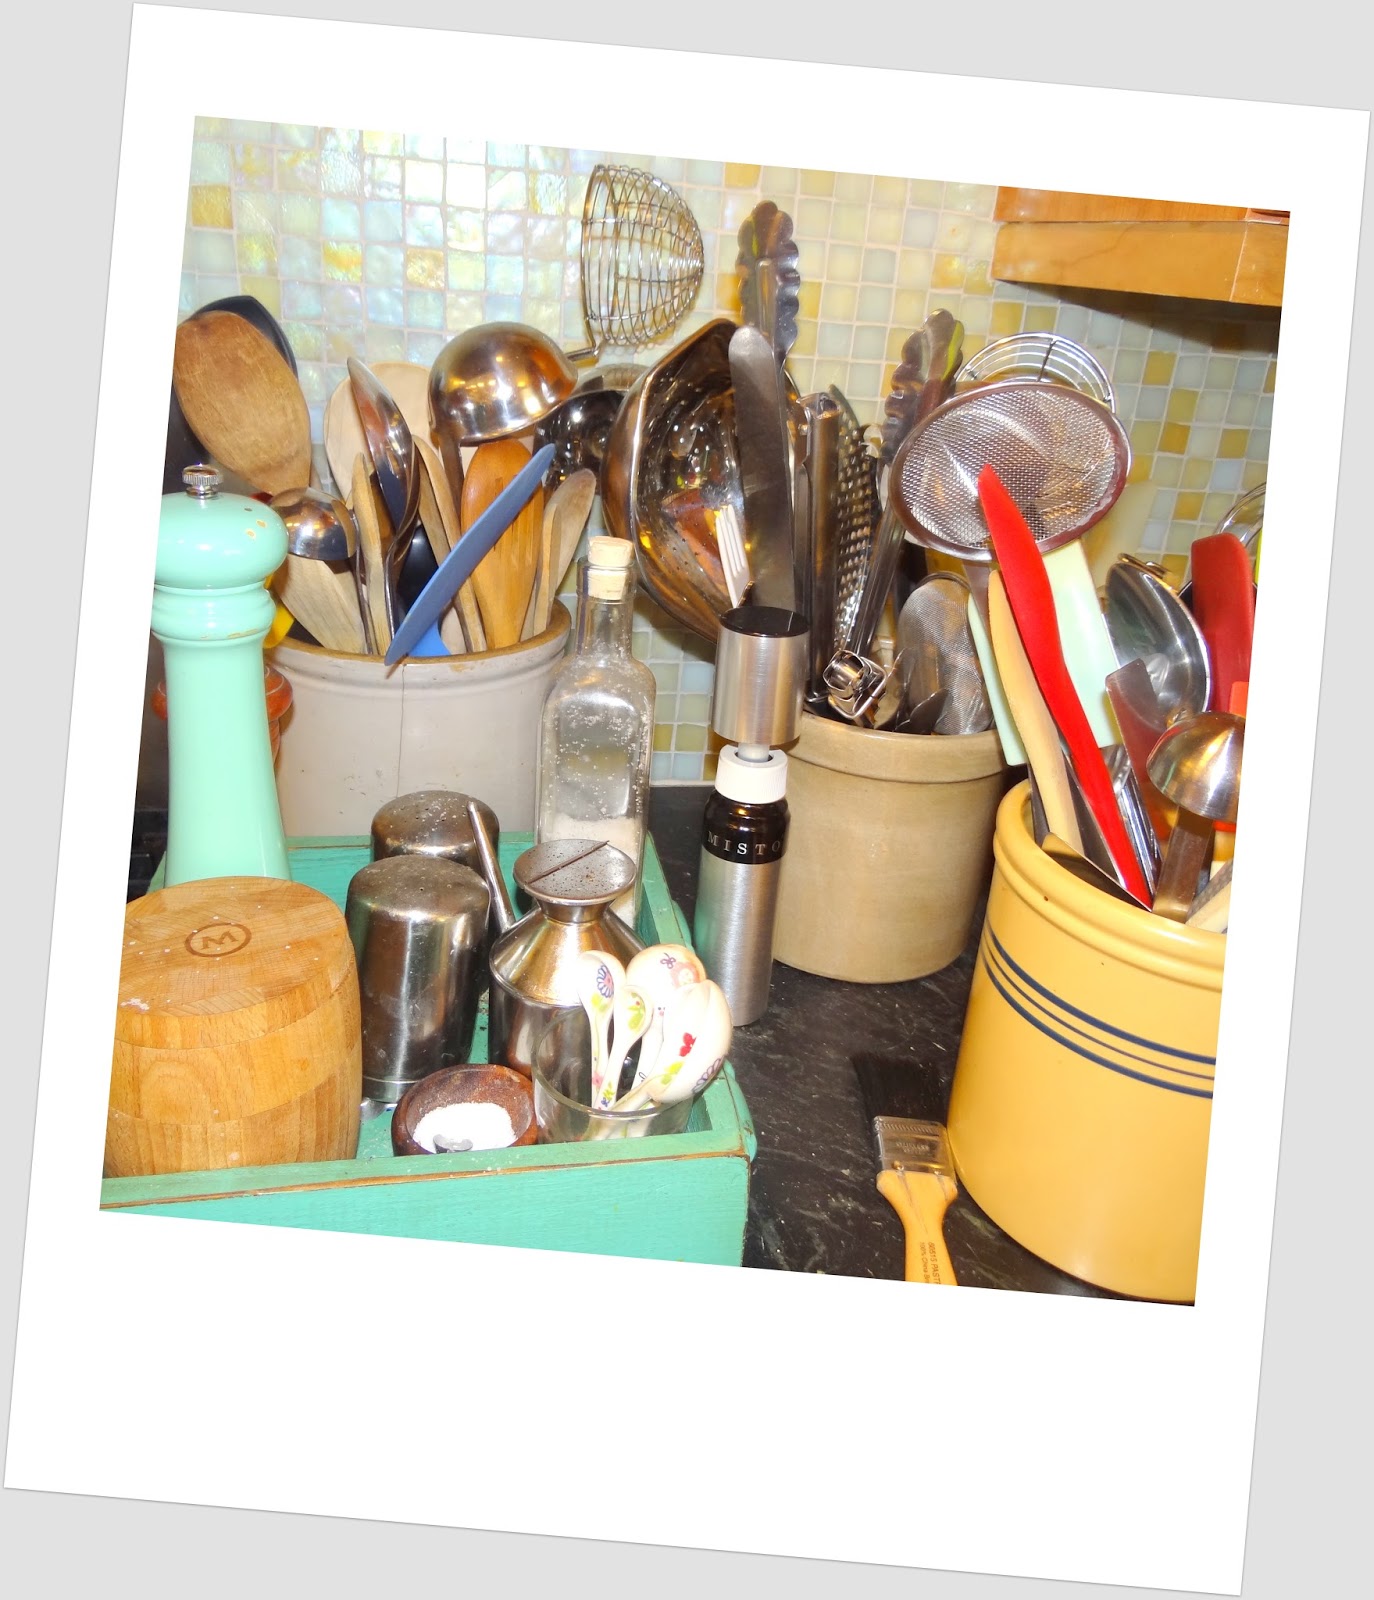
Kitchen Gadget Holders. I’m going to add a few more beside my stove! 

 I have been so frustrated lately with my bulging drawers that are sadly, not EVEN halfway deep enough to house all my junk. And it makes me feel unorganized. I have a gadget holder beside my stove that I had designed for me many years ago when my kids were little. It says “Patties Paddles”. haha.

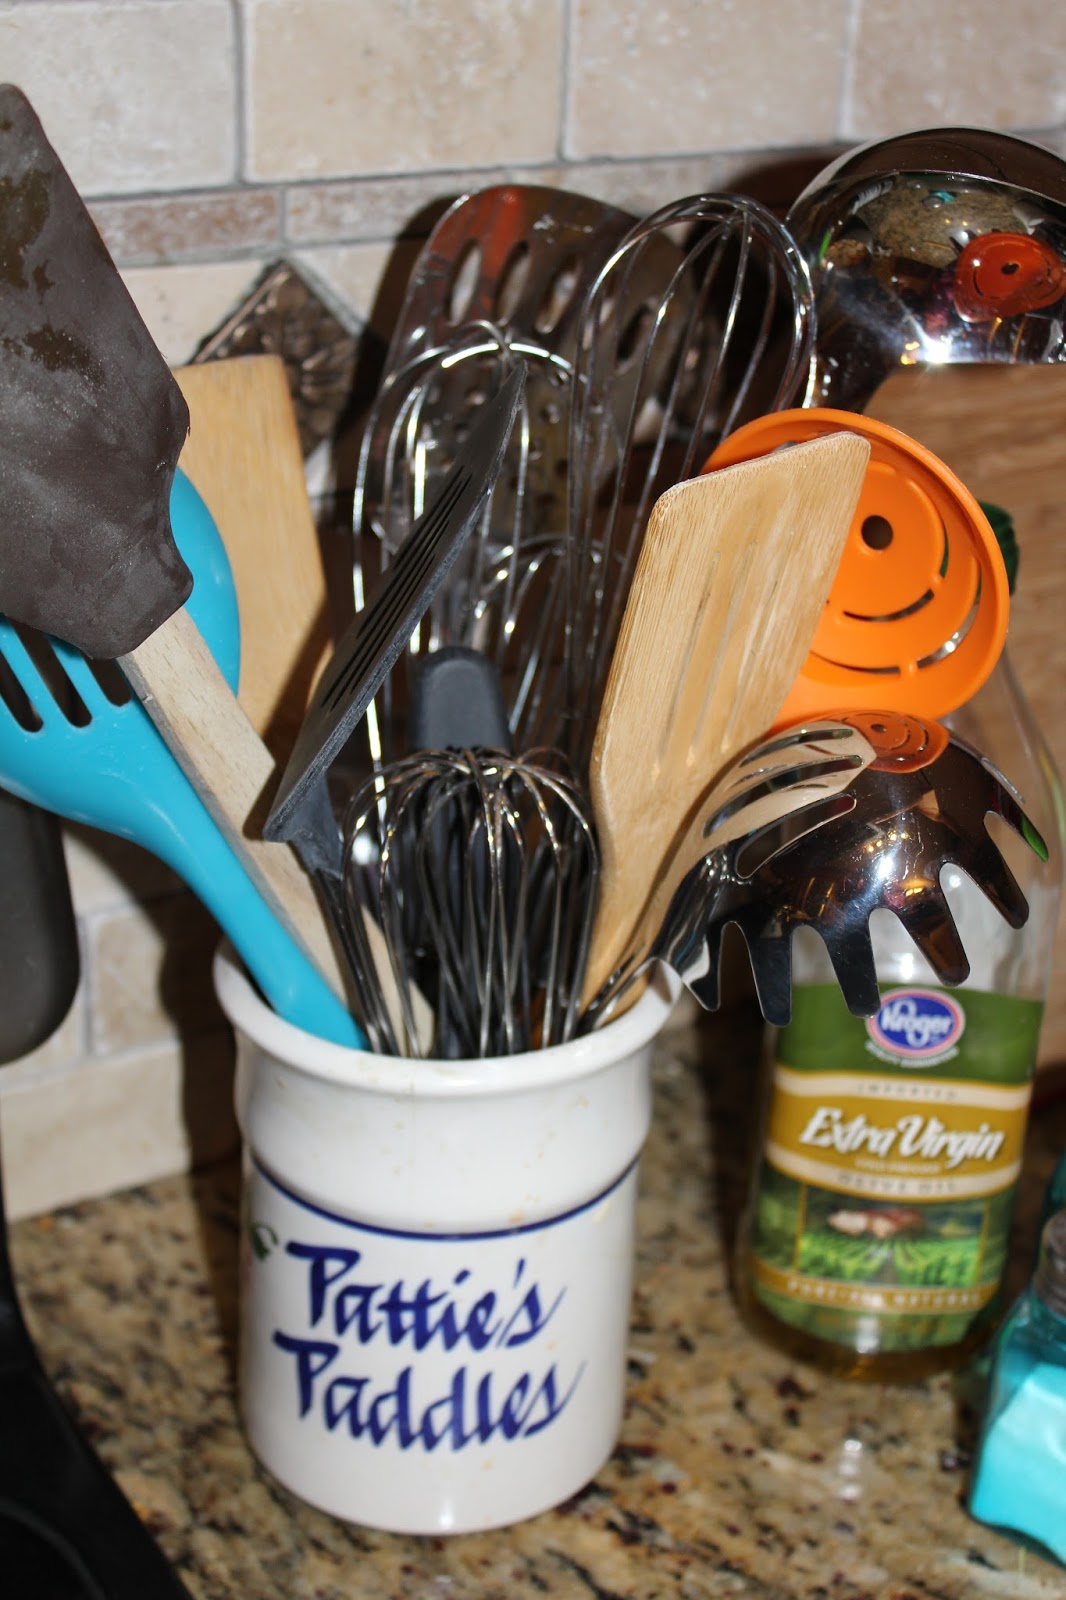
My Kitchen Gadget holder…..Patties Paddles used to be a cute saying. Now it seems kinda weird.

 That was in the days of wooden spoons. And no, I never hit my kids with a wooden spoon. It was just a joke I thought was cute. 20 years ago you could say things like that without somebody jumping out of their skin. lol.

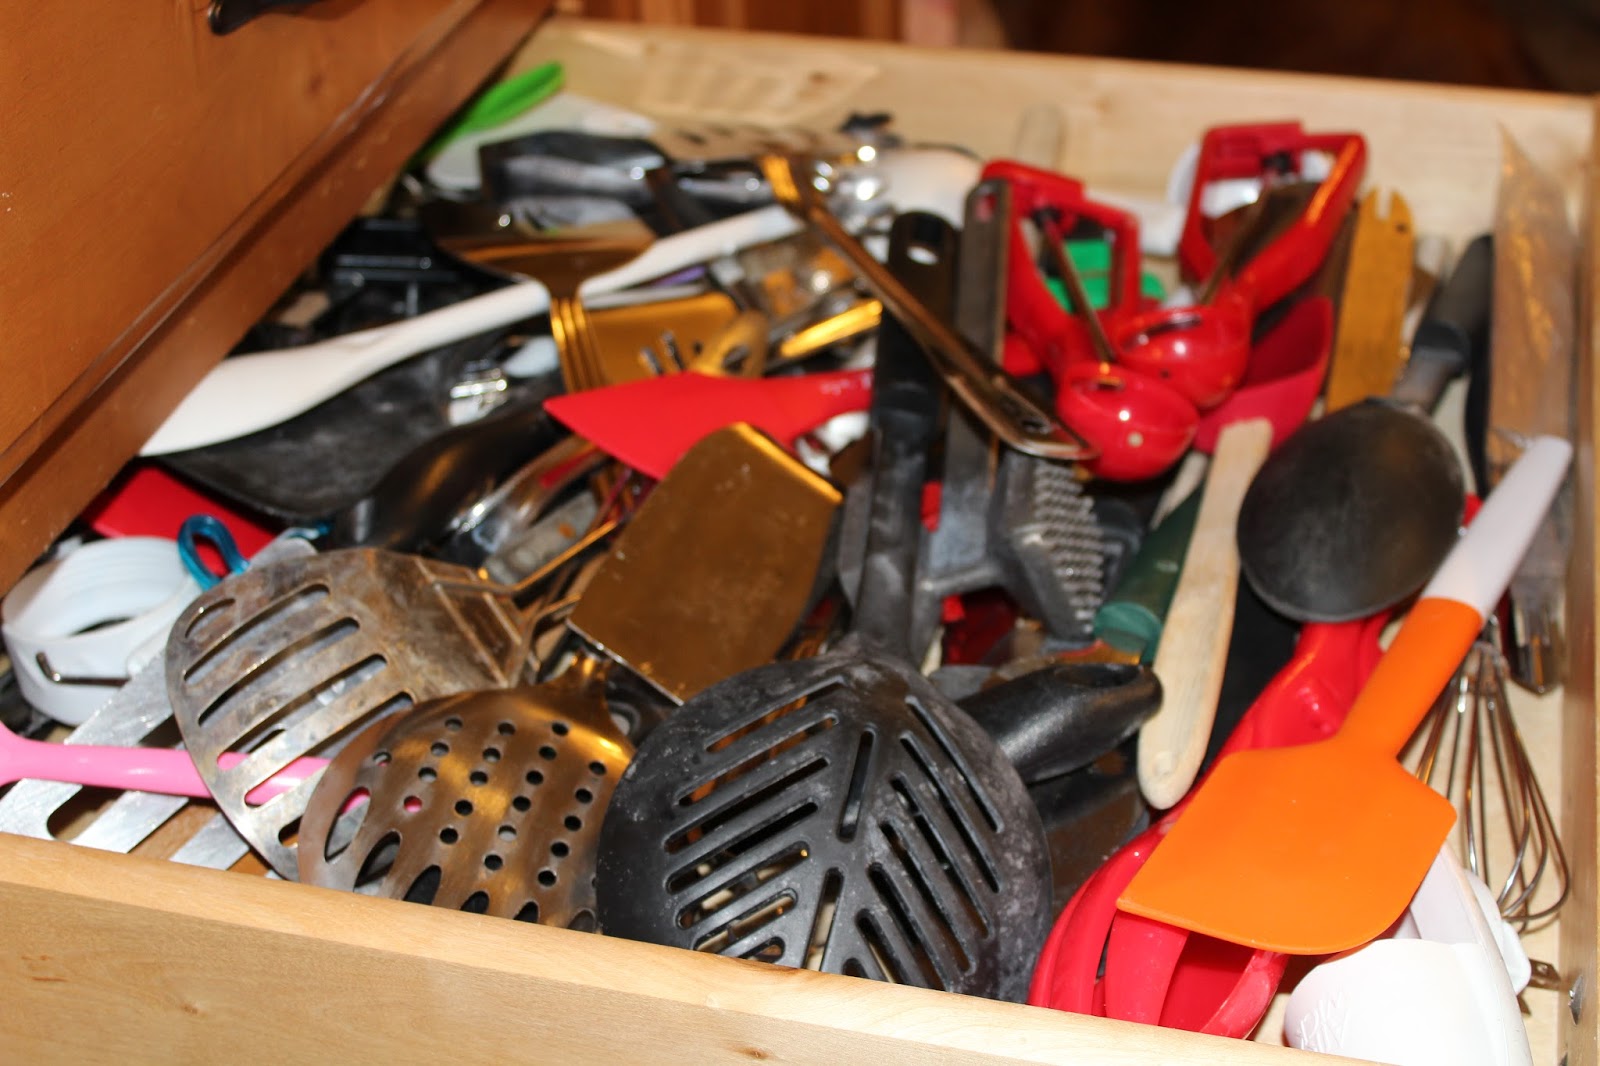
What a mess, right? My unorganized gadget drawer! And I have two of them! So sad. Bad me. 
You can see Gunner Dog in the corner of this pic. He’s such a good doggie. 

Well, here is my messy gadget drawer that barely closes. I think I can take Amy’s idea and simplify the whole big mess a little bit. It is actually so nice to just grab what you need while cooking instead of digging through a drawer. It’s my new favorite organizational tip. I happened to have a heavy, crockery, bean pot I’ve never used in like 8 years. I got it as a gift and loved it but have not used it. Well, now it has a new purpose.

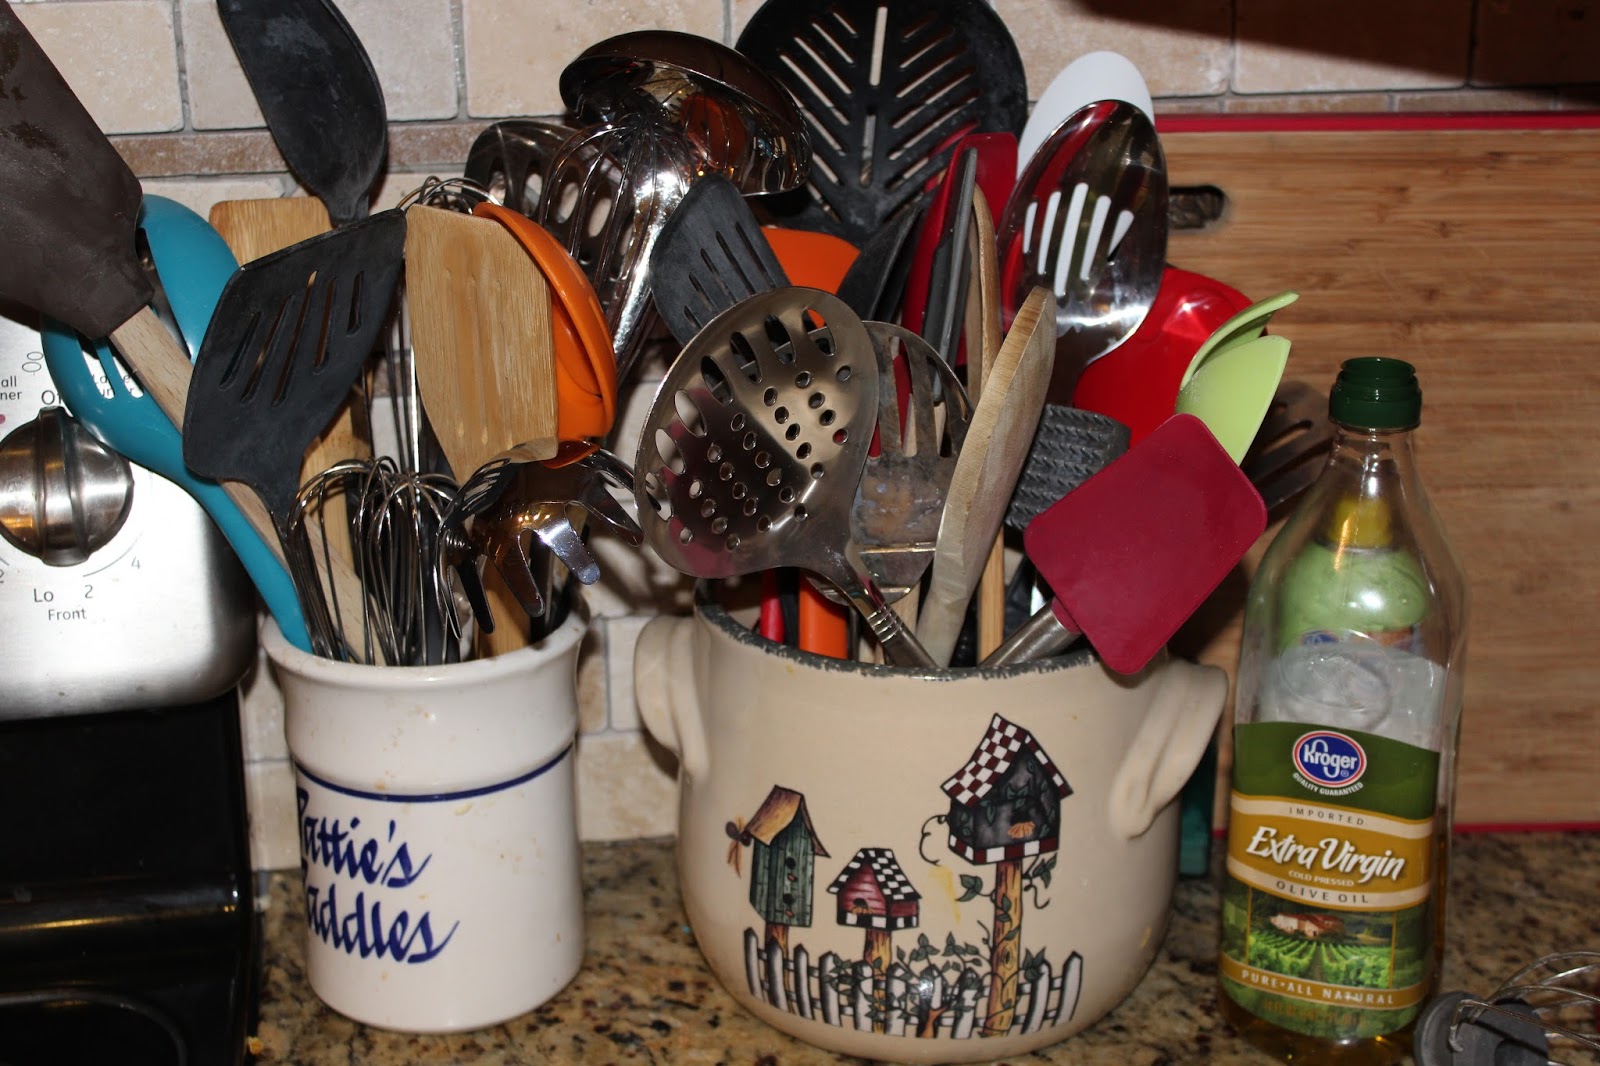
My Kitchen Gadget Holders. I’ve had this pot forever and never have used it once. Now it has a purpose finally! Yay!

I’m glad I never tossed this cute bean pot! You will definitely need a heavy, crockery container for all the metal spoons and turners and whisks and assorted kitchen gear. The crocks are pretty heavy and something light will just get knocked over too easily. I wonder if I can find these crocks at the the thrift store? I’ll have to check it out! 
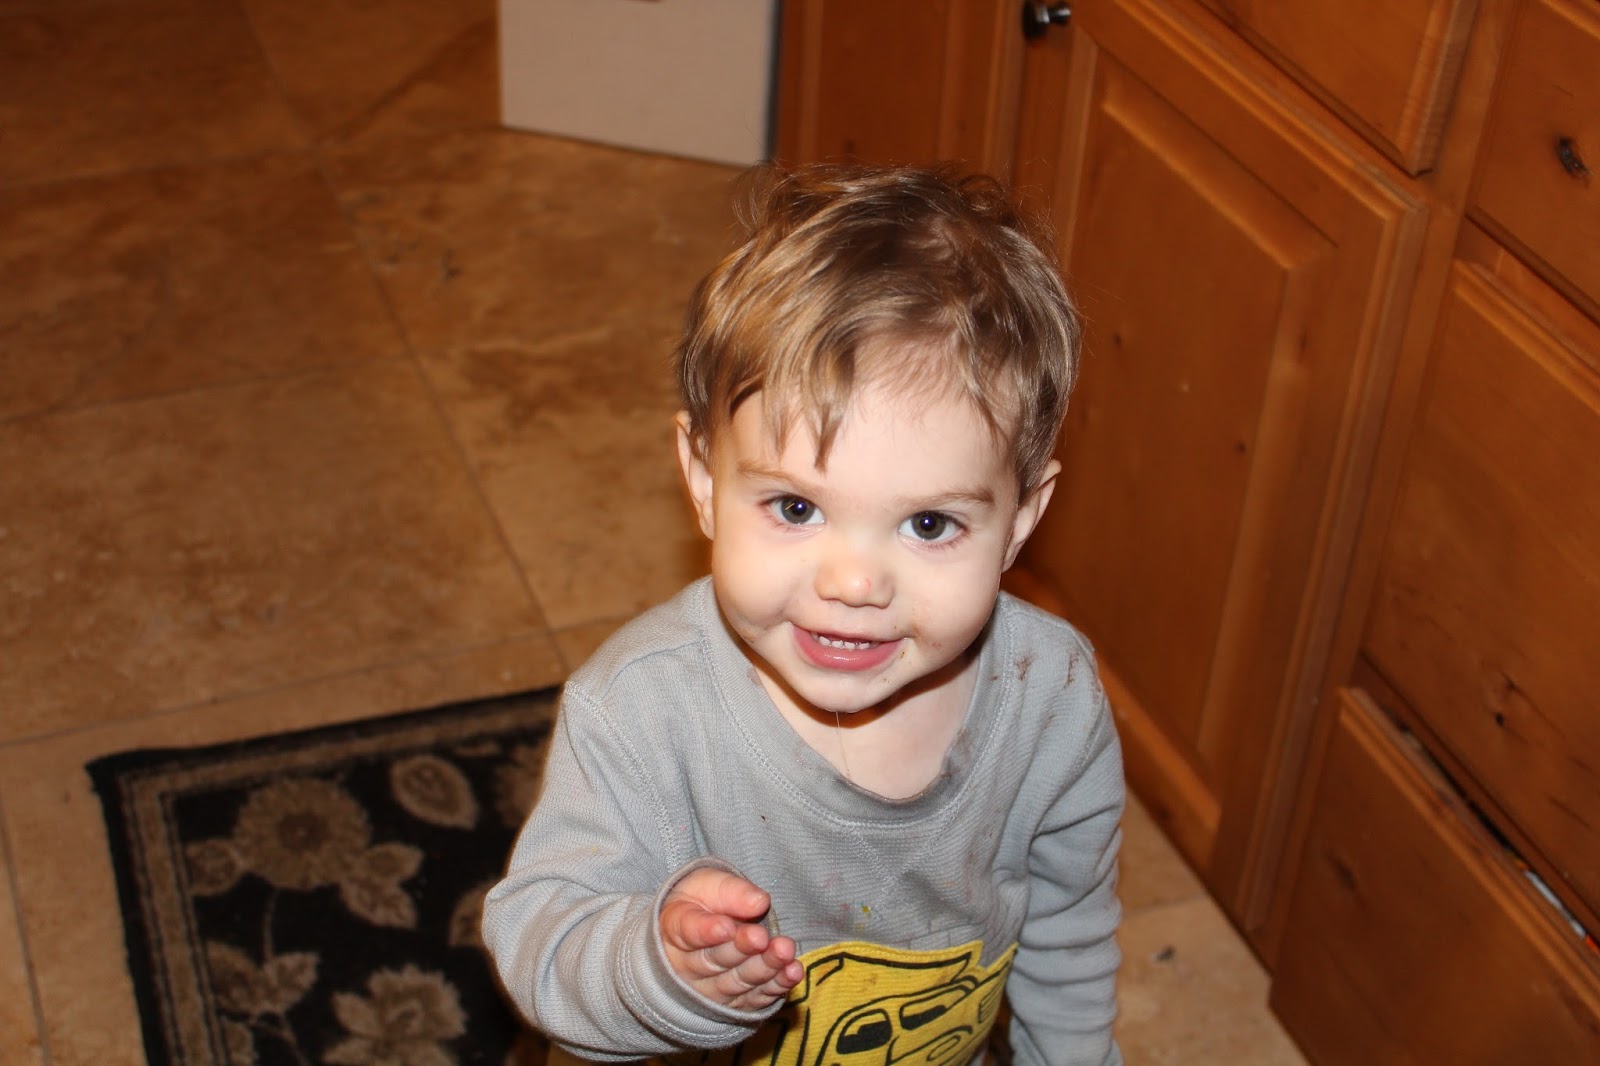
This little dude was helping us in the kitchen today. I got a little smile out of him too. He just started waving and saying bye bye. It’s pretty sweet. 

I should probably organize the crocks a little bit better. Maybe I can put all the silicone things together, and then  the wooden things together too. I need another crock for metal things. That would make me feel more organized. And it takes a lot less time to find things when they are sorted together.

Now it looks a lot better with 3 kitchen gadget holders; one for whisks and metal slot spoons, one for wooden things, and one for silicone and plastics. It’s lookin a bit better. And it feels more organized. 
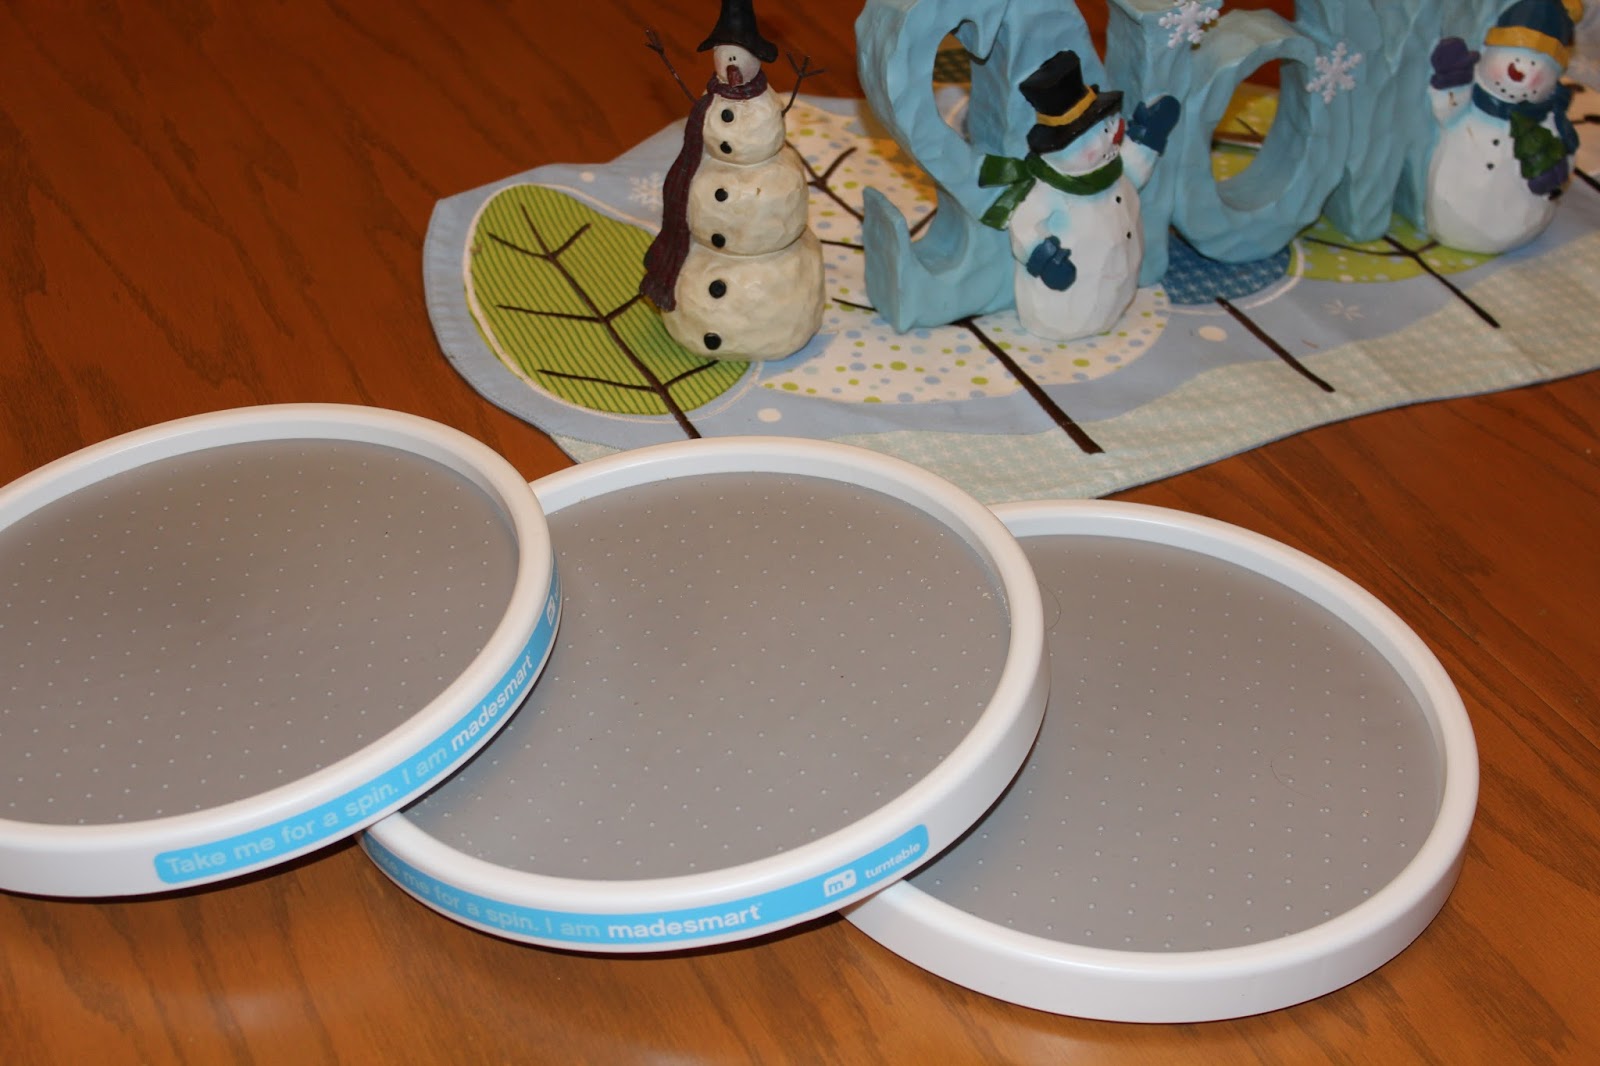
Lazy Susans are great for organizing a kitchen cupboard or pantry. I wonder if they will help me organize mine? I will actually have to do the organizing. That is the sad part. Maybe I can bribe somebody to help me. hmmm….

 I’m going to tackle the pantry next. That’s my goal for 2015 anyway. It is a real disaster area. I can’t even show it, I’d just die! I bought some Lazy Susan thingies from the Container Store for only $5.99 to help me. 

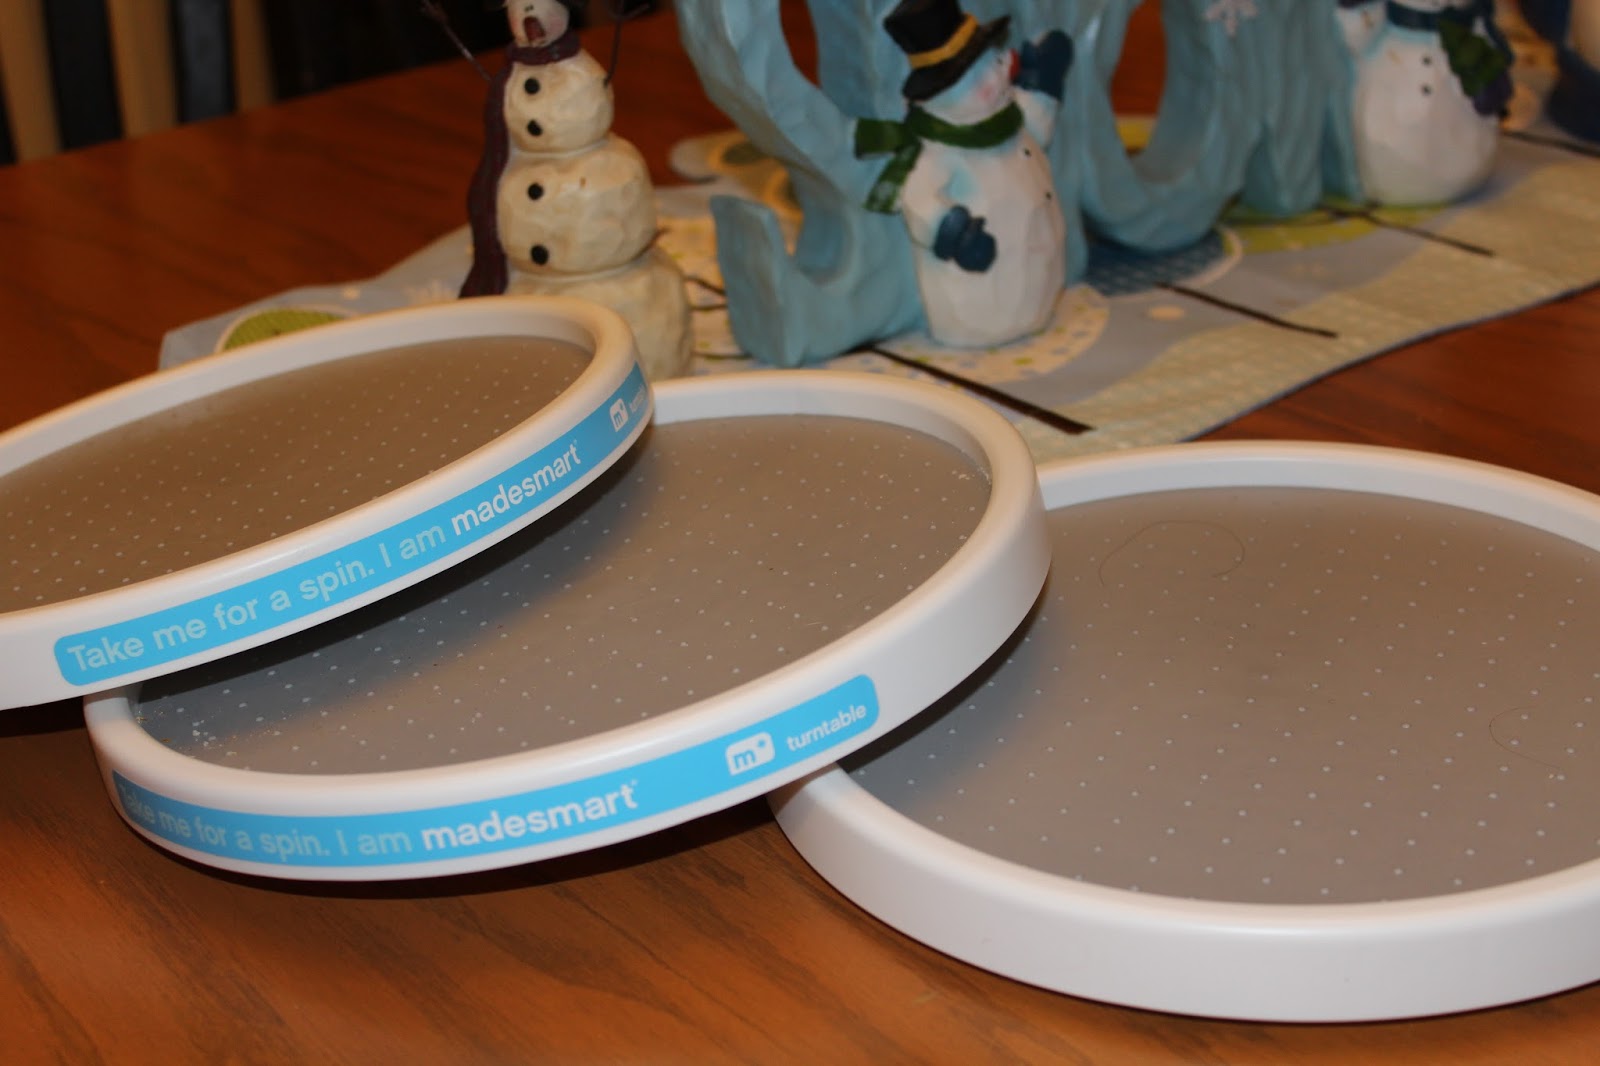
I use these to hold all my spices in those little cupboards on the sides of the stove that are so tiny and useless for anything else. Maybe I can do the same in the pantry. 

They are an easy way to organize spices and canned goods, cleaners, really just about anything. I am going to put in 1/2 hour twice a week towards organizing  the kitchen this month. That is my goal anyway. Maybe someday I can have drawers as organized as this! (don’t hold your breath on that one…)


I’m sure once I get into the project, I’ll spend even MORE time on it. (Yeah. Get real. That’s not gonna happen.) Hopefully I can soldier on through the mess I call a pantry. It may take me the whole bleeping year to organize my messiness. Wish me luck. 

Easy French Baguettes

Here they are, hot out of the oven! French Baguettes that are so light and crispy! You’ve GOT to try this easy recipe! 

Awhile back I went to a great cooking class and listened to a master cook and teacher named
“The Food Nanny”. She was just delightful and fun to listen to. She had so many food stories I could have listened to for hours.   Here is her book.

 It is less than $16.00 on Amazon. It is called The Food Nanny Rescues Dinner and it’s Here at Amazon. Check out her book, because she has such a great meal plan to help families eat dinner together and stay close!

  I didn’t have my purse with me so I didn’t get an autographed copy of it! DARN! But I DID get her to take a picture with me, when I told her I had a food blog. Isn’t she cute?

Me and the Food Nanny…yeah we are real tight….snicker….
 The Food Nanny is mom and a grandma too! (and she loves being a grandma best!)
She made pizza dough and french baguettes both in under an hour….

Anyway, she gave us all this fantastic recipe for French Baguettes!  It takes literally 5 minutes to make. She showed us this cool baguette pan too. I ran right over after the lunch class and bought one at Spoons and Spice….. my favorite cooking gadget store. They are having a huge sale, so check it out at Spoons and Spice.

They had so many french bread pans to choose from and they were surprisingly CHEAP!

My finished french breads…..Don’t they look great?  They are crunch on the
outside and soft in the inside…perfect to my taste…..
French Baguette recipe….totally easy and seriously yummy! 

Then I went to work. A half hour later here were my baguettes.  They taste just like a crusty french bread should. And no fat!  She gave us all kinds of tips about meal planning that I thought were fabulous! In a nutshell here is her plan….

Sunday is traditional day…roast beef, chicken, those kinds of things.
Monday is Comfort food…chili, mac and cheese, easy stuff like casseroles….
Tuesday is Italian night….she does all her pastas here…she has tons of varieties….
Wednesday is Meatless night….soups, salads, fish, or breakfast for dinner, waffles, french toast, pancakes, bacon, etc.
Thursday is Mexican Night. Tacos, Enchiladas, mexican casseroles, burritos etc.
Friday is Pizza night and all the kids invite their friends over for her out of this world pizza varieties.
Saturday is Grill night. They do a lot of hamburgers or chicken on the grill.

Doesn’t that sound fabulous and fun?  I thought so too.   Gotta give that plan a try. The thing she stressed, that I really liked was how she said it kept her family together while her husband flew planes in the military and later for an airline. He was gone a lot. She was like a single parent. And dinner around the table every night added structure to her day and a bonding with her kids. They still all come back for Pizza night. She has many gourmet types of pizza as you can imagine. Her favorite is arugula, fresh mozzerella, cherry tomatoes and olive oil on thin crust. I’ll do that on a later post.

Yeast mixed with warm water and sugar…..let it foam up a bit…..
Then add the flour and salt and mix up with warm water….a little at a time until it is a nice ball….Then knead
for a minute on the counter….
Here are mine kinda kneaded and waiting to be put into the pan….took 5 minutes to make and roll!  
I went over to Spoons and Spice to see if I could find a “Baguette Pan” 

 HERE is a page full of coupons to Spoons and Spice. It’s a really fun place to browse around if you are a foodie like me.

Anyway it looks cool….it’s 2 long u shaped pans for breads….

The food nanny makes this bread and gives it away for people’s birthdays and special occasions. What a great gift idea and so quick. Who wouldn’t love some hot french bread homemade by you?

Here’s the Baguette pan.  It was only $5.99 at my local kitchen things store. (Spoons and Spice)

Recipe for French Baguettes… SO EASY!
1/2 Cup Warm Water
1 1/2 Tablespoons Yeast
1 teaspoon sugar
1 teaspoon salt
3 1/4 cups flour add a cup at a time
Add up to one cup warm water to get perfect consistency

Mix up first 3 ingredients in a small bowl and let sit for 2 or 3 minutes. (sugar feeds yeast so let it set awhile) Then in a separate bowl add salt and flour and add it to wet mixture, and then add the (up to 1 cup) warm water. Mix and then knead for a minute. Roll out in 2 loaves and lay them on greased baguette pan and let rest for 15 minutes under a towel (it will rise a bit).  Then bake 450 for 15 minutes or until golden colored.   This whole french bread takes about 35 minutes total to make and bake.

So here they are before the 15 minutes rising time…..Both have their own tube to sit in….
And here they are after the 15 minutes rising time….I put a line down the middle of each with
a sharp knife just before popping in the oven….it will look just like french bread when it has been baked! 
Wha la!  Ready for a hot 450 degree oven for about 15 minutes….watch it the last  minute or so…..
And here they are, hot out of the oven! French Baguettes are light and crispy! 
Well, they are just plain DEEE-LISH!  That’s what they are! My hubs liked thema lot. And I sent one down to my friend Lauri down the street. Spread the lovin!   
Then Spread some REAL butter and dig in!  mmmm….Yummy! 

8 Minute Caramel Dipping Sauce

I love dipping Granny Smith and Honeycrisp apples into warm, gooey caramel. I was at an event recently (The Festival of Trees) and we bought some warm caramel sauce and cut up apples and enjoyed them sooo much. I thought I would look for a recipe and make some of the sauce tonight for New Year’s Eve. We have several parties to go to but this is just for us to enjoy at home. But it would also be a great treat to bring along with us to the parties.

My Easy Caramel Dipping Sauce.  It literally takes about 8 minutes to make, but it is so evil delicious!
For Easy Caramel Dipping Sauce I started with the cream, sugar and butter and let that all melt together on low. 
After you dump the butter in, add the vanilla and salt and let it get the Caramel Sauce up to a rolling boil, stirring as you go. 
Easy Caramel Dipping Sauce….. stir it while it bubbles for 5 to 7 minutes. It will look lucsious like this! Can you say….delightful deliciousness? Mmmmm…..
I put the Easy Caramel Dipping Sauce  on a tray with Granny Smith and Honeycrisp apples for a holiday treat. This would be so easy as a finger food for a New Year’s Eve Party! Or what a nice hostess gift in a pretty jar with a ribbon and a cute label? 

 Here is the recipe I used. All you need is butter, brown sugar, cream and vanilla and salt. It was super easy. I would boil the mixture for the full 7 minutes. It said 5 to 7 minutes so I went with 5. But I wished mine had been a little thicker. It thickens as it cools, but to make it even chewier and thicker, let it boil for the 7 minutes. This recipe is taken from The Pioneer Woman’s website, HERE.

Notice my 2 little granddaughters are standing right in front of the Easy caramel dipping sauce and apples? They are READY to dig in to this yummy stuff. 

You can use half and half OR cream, and I had cream on-hand from making Alfredo a few nights ago. So I used the rest of the pint. Bubbling boil it for 7 minutes to thicken it up. Or thinner sauce I’d go less, more toward the 5 minutes mark.

Now I’ve taken down more than half of the Christmas decorations and replaced them with January “Snowman and Winter themed” decorations. Don’t they look cute? 

It is always a little bit of a downer to change out all that Christmas gloriousness. So I have to replace it right away or my house looks very dull and depressing! To see more check out my
 Patties Place blog.

Here’s my kitchen table with some snowman decorations. It is starting to look a little bit wintery with the shades of blue. 

8 MINUTE CARAMEL DIPPING SAUCE

Ingredients

  • 1 cup Brown Sugar
  • 1/2 stick Butter (4 Tablespoons)
  • 1/2 cup Half-and-half Or Cream (cream Will Make It Thicker)
  • 1 Tablespoon Vanilla
  •  Pinch Of Salt

Preparation Instructions

Mix all ingredients in a medium saucepan over medium-low to medium heat. Cook while whisking gently for 5 to 7 minutes, until thicker. Turn off heat. Serve warm or refrigerate until cold.
If sauce is thin, just continue cooking for a few more minutes. This would also be so wonderful drizzled over cheesecake! Mmmm. The possibilities are endless!  
Good luck taking down all of your Christmas decs the next few days. And have a very Happy New Year Y’all!

Chocolate Fudge Icing

I love a good chocolate cake, don’t you? It’s one of the best dessert around! And one of my favorite ways to ice a chocolate cake is with a fudge glaze. This one is an easy and yummy cooked icing that is great for cupcakes, eclairs, donuts, cream puffs and cakes.

I have our Christmas Table Setting all done for Breakfast Christmas morning. We have grandma and Grandpa come for Brunch every year. 
I have 3 granddaughters who all like to sit at their own Kid’s Table setup with little plates and sippy cups and kiddie chairs too. Here is one of the dinner parties we had set up. I used snowmen plates and cups. 
My Kitchen is all festive with lots of Christmas doo dads too. 

I have Mrs. Santa in the kitchen with her cupcakes, and the Nutcracker playing on my under the counter CD player. It is on its last legs. The hubs has something coming from Amazon for me that is the newest thing. He had to be “Invited” to buy it. I guess it plays wireless music from somewhere I’ll never understand. The cool kids and their gadgets! 

This was my favorite area of the kitchen this holiday. I just loved it. The chalkboard said how many days left till Christmas with a snowman holding it. I cut his head off, great photog that I am! lol. 

This island wall just filled with crap the last week before and this whole week after Christmas. I am so full of junk food, breads, chocolates, cookies, marshmallow santas ( I ate 4 I think) and nuts and candy, chips and dips. When will it end I tell ya! 

 I started putting all the Christmas junk away today. It is a little sad. I love decorating for the holidays so much. But I switched it all out for snowmen and snowflakes. So it isn’t too hard to bear. 😀

Kiddie table this year in red and green with snowmen. 

Grown up table setting was very pretty. I loved this table runner with red pointsettias made with red sequins. And the holly berry brocade placemats are some of my all time favorites. 

We make Gingerbread men and woman for Christmas Eve decorating fun. 

And some Sugar cookies too. 

We made this Cranberry Cilantro dip and pour it over a block of cream cheese to eat with crackers and Wheat Thins. It is delicious! Check it out HERE. It is fun for New Years Parties too! 

I’m getting my cinnamon rolls ready. We will add THIS MONKEY BREAD recipe to them. It just makes them more gooey and delicious with pecans too! Yummy. 

Some of my end tables in the living room all decorated cute. I also make this breakfast casserole that is traditional in our family. It has hash browns, Jimmy Dean sausage, eggs, cheese and it can be cut into 12 to 16 pieces for brunch or breakfast. Check it out HERE.

We have to leave out some cookies for Santa tonight while we watch his progress on Google Santa Tracker. It is fun to see what country he’s at every minute. 

Anyway, if you are making a chocolate cake, cupcakes, cream puffs or anything that would be made better by a fudgy, chocolate icing that really does taste like fudge, then this is the recipe for easy, fudgy icing. 

 Chocolate Fudge Icing 
1/2 slick real butter
2 Tbsp. cocoa
2 Tbsp. milk
2 cups powdered sugar ( I used a little less, just add it till desired consistency)

Put butter and cocoa into a medium saucepan. Add milk. Heat until melted, stirring constantly.

Slowly add 2 cups powdered sugar until melted and smooth.

Chocolate Cake with Fudgy Icing….. so, so good! 
Chocolate Bundt Cake – Is just as good with the chocolate fudge icing as the traditional cream cheese icing. So you just have to choose your poison! I love it on Christmas eve. It is also great for a New Year’s Party. Happy Holidays! 

Snickerdoodle Cookies for Coworker Gift Bags

Teachers have lots of coworkers. We have parent helpers. We have a boss and office staff. It can get crazy if you want to give gifts to lots of the people who help you do your job. I have found the most personal gift that won’t also break the budget, is a homemade box or bag of cookies or candy.

Holiday Snickerdoodle Cookie Giftbags for Coworker Christmas Gifts 

This year I am giving some yummy and easy Snickerdoodles to my people I visit, in the neighborhood, coworkers and school staff. I found these adorable bags at Walmart for $1.00 for 5 of them or 27 cents each for just a couple.

Gift bags from Walmart. They are very colorful and festive. I just added a cute gift tag, bagged the Snickerdoodle cookies in a holiday Ziplock baggie, and added bright, red, tissue paper.

I made a double batch of this SNICKERDOODLE recipe.

  • 1 cup Unsalted Butter (2 sticks)
  • 1 1/2 cup Sugar
  • 2 Eggs
  • 1 teaspoon Vanilla
  • 2 3/4 cups All Purpose Flour
  • 2 teaspoons Cream of Tartar
  • 1 teaspoon Baking Soda
  • 1/2 teaspoon Salt
Mix together and then roll walnut sized balls in cinnamon sugar mixture. Bake at 350 for 8 to 10 minutes. After 5 minutes open oven and sprinkle red or green or both sugars onto flat cookies. 
  • 1 tablespoon Cinnamon (mix together cinnamon and sugar and roll dough balls in before baking)
  • 3 tablespoons Sugar 

I rolled them very lightly in a 1 to 3 ratio of  cinnamon to sugar mixture and popped them in the oven. If you want your to turn out more rounded than flat chill dough for 45 minutes before rolling and baking.

Easy Snickerdoodles 

After the cookies had baked 5 minutes and were flat, I opened up the oven and sprinkled red and green decorating sugar on them lightly. They are crisp on the outside and chewy on the inside, with a hint of cinnamon.

Snickerdoodle Cookies with red and green sugars! Great Co-worker gift bag! 

The gift bags are cute with the tissue paper and the gifts took me a few hours to make but now I’m all done! I like how they turned out too. Yummy!

Snickerdoodle Cookies are always a yummy and inviting treat for a gift bag! 

I always love a good home-baked  bread or cookie as a gift. I have a friend who delivers caramels homemade and another who always makes English Toffee. And my good neighbor down the street brings over a homemade berry pie every year. I love the personal touch. And you can’t go wrong when it tastes yummy.

Turkey Cupcakes and Scarecrow Cupcakes for Thanksgiving Dessert Table

How about making some Thanksgiving Cupcakes for the kids this year? If you want something different in addition to the pumpkin pies, how about Turkey or Scarecrow Cupcakes? Or a Pilgrim’s Hat from a Reese’s Peanut Butter Cup? Yum.

These turkey cupcakes were made with jawbreaker and lemonhead heads (giant sized shown below) and candy corn beaks and feathers. They were super easy, little kids could even do them. Adults would just have to add the eyes in a fine icing tip.

These jawbreakers and lemonheads make great turkey cupcake heads. 

These Scarecrow Cupcakes were made from Orange Slices (and other colored gumdrop flavors) and candy corn and Chocolate chips or M & Ms for eyes. The hair is Chinese crunchy noodles. 
I also bought a Wilton Package of Cupcake toppers in leaves and pumpkins. I added the leaves to the Scarecrow heads for a hat decoration on the Thanksgiving Scarecrow Cupcakes. On the Turkey Cupcakes I added the pumpkins for an added decoration. Check them out below. 
We did a Thanksgiving Buffet for a School Party and this was my contribution. These cute turkeys are made from gumballs or candy “Lemonheads” or “Jaw Breakers” in the large size. (They were Halloween candy leftovers!) Then I added candy corn for the feathers and some icing eyes. 
These Peanut Butter Cookies I added Reese’s Pieces to them for fall colors. They were gobbled right up on Thanksgiving Day!  
Easy Scarecrow Cupcakes. They were tasty and cute too! 

 And the Thanksgiving Cupcakes made a very cute dessert buffet table too! The kids in your family (big kids or little kids) will all love them. You could also use this as a fun activity after Thanksgiving dinner too. Kids would love to decorate their own cupcake with candy!

Last year we made gingerbread houses and these cute Cookie Pilgrim Hats from a Keebler striped cookie and a Reese’s Peanut Butter Cup. The “buckle” is a cut up gumdrop. 
I just added some Milk Chocolate chips to the Cupcake batter to make it a little bit richer and yummier. Sometimes I add a small chocolate pudding box to the dry mix and a cup of sour cream if I want them super rich and tasty. 

 Try adding some chocolate chips to your next batch of chocolate cupcakes. You will love it. If I use yellow cake mixes I add butterscotch chips to the batter for cupcakes and for cakes too. And I’ll add a vanilla pudding small box (dry) and a cup of sour cream too. It just makes your cakes and cupcakes RICHER tasting!

Then I frosted the cupcakes and used chocolate sprinkles for the chocolate cupcakes before decorating them further. 
Cute little Turkey Cupcakes would be super easy for even 4 year olds to put together You would just have to add the frosting eyeballs. I just used a writing tip and made dots with white and chocolate icing. You could also buy the premade eyeball candies. 
Have some fun this Thanksgiving for your kiddos and grandkids; make Turkey Cupcakes! 
Or Scarecrow Cupcakes.  Or make both kinds on Thanksgiving Day for a fun activity after everybody has enjoyed the turkey dinner!  We have made gingerbread men and houses too. It’s a fun activity for kids and a sweet memory.

Then when you are all done eating. Play some Thanksgiving BINGO HERE FREE, or else play Pin the Hat on the Turkey. I got mine from the dollar store! 😀 Have more fun on Thanksgiving Day with your kids and grandkiddos!  

Fall and Thanksgiving Decorating

I’m starting to decorate my house for Thanksgiving now that Halloween is over. ( sounds of sniffling). I have ALMOST as much junk to decorate with for Thanksgiving as I do for Halloween. But not quite as much.

I do love the FALL SEASON best of any other. I love the colored leaves, the pumpkins and turkeys everywhere, and I love fall linens and tablescapes. If you want to know my Top 10 Reasons Why Fall is My Favorite, see my rant HERE.  Here are a few tablescapes I snapped recently.


Here is my placemats and china I used last year. But I got some really pretty placemats with a lemon branch on them from William Sonoma a few weeks ago. I’m going with a green and yellow color scheme.

I just got these beautiful placemats at William Sonoma when I was down in Provo from the Chalk the Block Festival. 

Mr. and Mrs. Pilgrim and the little tiny Thanksgiving peeps.  My grandkids love to play with this little table and the indians and pilgrims. 

You will NOT believe it but this scarecrow is made from a white mop. Yup. It’s a mopcrow…..or….a scaremop…..or…..a scrop! Yes, that’s IT! Or maybe it’s a mop-a-row. hmmm….

Kitchen counters with my leftover Halloween pumpkin and some glassware. 

Here is the coffee table decorated up with my cute scarecrow and those gross tasting but cute candy corns for Thanksgiving. They have some brown in them. 

This is the funniest looking turkey you ever saw. WE always laugh at it every stinkin year! 

Writing desk in the living room has some cute decor for fall now too! 
Here is the front entry table. I love the cute table runner I got a few years back. It has all the fall colors. The turkey is from Kohls. I got it on clearance last year. 
I made these little pilgrims out of a 2 x 4 and our bandsaw. The boy has a little wooden turkey on a piece of brown twine. The girl is holding a small basket of “apples” but they are kind of reddish orange so they could be pumpkins…who knows! The hair is twine and the bonnet and collars are felt. 

I printed up this Fall subway art and matted it in pumpkin colored paper with a cool mahogany colored wood frame. The free printable is below.

I got this printable from Simply Sweet Home. I love it. 

Kiddie table is cute and ready for Thanksgiving. I made this tablecloth from some clearance Thanksgiving fabric I scored. 

I added some butterscotch colored candles to the hurricane lamps on the piano and some silk florals to a ceramic watcr pitcher I found at Michaels. 

My daughter Tiffany had this pretty mantle made up for fall that I loved too. We both like decorating a little bit for each season. Happy Fall Ya’ll! 

Chicken Pot Pie to Die For

 I love a good Chicken Pot Pie. It is such a great comfort food.  My daughter-in-law, Wendy, made the most delicious one I’ve ever eaten at my granddaughter Chelsea’s birthday dinner party. I had to go home and try it. So she shared the recipe with me. It has become one of my all time favorites. Mostly because of how easy it is. But also because it tastes so dang good!


Homemade Chicken Pot Pie  is the perfect meal for these chilly, fall days we have been having. And walking in the house my hubs called out, MMMMM, WHAT is that YUMMY SMELL?  Yeah. It makes cooking for a man very, very fulfilling, yes it does.

It is pretty easy if you use frozen peas and carrots. (I used fresh carrots that come in those little 1 pound bags already cleaned).  All you have to do for Chicken Pot Pie is dice up a few chicken breasts, a few potatoes, onions and some celery. The rest is super EASY PEASY! But it is so flavorful and mouth watering!  
The Walmart brand pie crusts (Great Value) are surprisingly flaky. If I am lazy or in a time crunch I use those. Wendy recommended them too. 

Here is the Recipe for Chicken Pot Pie to Die For! It is adapted from one she found on All Recipes.com by Robbie Rice. She adds potatoes. (So I did too).  Then I adapted a bit more by adding a half of a chicken gravy packet to my “broth” and I sprinkled in some added lemon pepper instead of celery seed. I added some leftover rice to one of pie instead of potatoes. You could also switch out turkey for the chicken if you prefer.


CHICKEN POT PIE TO DIE FOR

  •   1 cup diced potatoes (par boiled for 5 minutes)
Chop and dice up all the veggies and chicken into a bowl. Add spices, flour, butter, milk and broth. Dump in 1/2 packet chicken gravy. Mix. Roll out pie crust and put in a 9 inch pie pan. Dump the pie filling into it. Cover with another pie crust and pinch the sides around with your thumb and forefinger to decorate. Bake at 425 for 30 minutes (more or less) or until golden brown on top. If the edges start to brown too fast put a strip of foil around them. 
Let set out for 15 minutes before cutting into the pie so it will stand up better. 
Enjoy! Serves 6. 
The “Great Value” pie crusts from Walmart are really tasty. I used these for the top and bottom, and they were on sale! SCORE! 


Try it one of these cold, autumn days after work. It only took about 30 minutes to bake.

Yummy Chicken Pot Pie. It is Oh SO Yummy! I promise!

Bridal Shower Fun and Food Ideas

My daughter Tiff and I went to a really cute Bridal Shower for my Niece Becky and had a real fun time.

Besties Nikki, Becky and Elyse. All 3 have a foodie blog! All 3 grew up together. 

I loved this pretty invite to the Shower. It was designed on photo paper. Cute!  

The hostesses were 2 of her best friends who are also bloggers. One was Nikki, of Chef in Training, and another one was Elyse, one of the Six Sisters Stuff sisters.  As you can imagine, the food was delicously wonderful.

Here is a little bit of it. We had lots of fun and yummy party foods at the Bridal Shower. 

There were so many  things to choose from! Salads, sandwiches, finger foods and lots and lots of sweet treats!
This fruity salad with Asiago  cheese, apples and berries and sliced almonds was my favorite. 

Some kind of bruschetta. It looked yummy. 
I just really liked this water dispenser. Got to get me one of those. 

Lots of friends from the neighborhood and ward were there too. 
Some of these girls went to high school together. 

 The brownie treats on the top were my favorite. Yum. They were to DIE for! I was a good girl and only ate one. 

They are called “Samoa Brownies” and the recipe is HERE.  These are decadent and oozing with flavor! Mmm. I want one in my mouth right this minute! 
Mother of the bride, my pretty sister-in-law Robin, and her youngest daughter pretty Becky. 

She had lots of friends there who were already married so they really spoiled her. She got lots of good loot!

Just some of the loot from the party. 
Loot for the kitchen parked at the door. 

Lots of  girlfriends at the shower. Many of them had been married a while so she’ll have lots of peeps to go to for advice. 😀 

I thought this gift was wrapped up so pretty! Great idea for a Bridal Shower. 

Guess the Groceries Game was a great Bridal Shower Game! 

This was a fun game. We had to price all these items from Walmart. I was off by about 80 cents. I was pretty close. Yeah. I’m a Walmart rat.

 Okay back to the food! These cake bites were so pretty. Mine never turn out looking this good. I think I need cake bite lessons. I think these were lemon flavored. And I did love them.

These Swig Copycat cookies were so good too! Swig is a drive through in St. George Utah. It is a fun place to go get a treat when you are down there going to see a show at Tuacahn. They have chocolate ones too. I’ll have to try one of those. 

Real Swig Cookies come in all these varieties. 

Check Swig out next time you’re in St. George. It’s a fun stop! 
Yummy brownies. I didn’t try one but don’t they look so yummo? 

It was a really lovely bridal shower for Miss Becky.  She is such a pretty lady. And so is her mama. We are so happy for you Becky, Mrs. Secrist. Love you. 

Crockpot Mexican Chicken for Tacos and Burritos

This is a DIVINE and EASY way to do a Crockpot Mexican Chicken. You only have 4 easy ingredients, and they are easy to make in the crock pot, or in the oven in only a few hours. Dump everything in and let them simmer all afternoon. Then fry up some tortillas, or use some store bought flour tortillas, and dinner is served!

Crockpot Chicken Tacos….easy and very yummy! 


I have always loved Tacos. Even as a very picky child, I would always eat my mom’s homemade tacos. But it wasn’t until I was married that I really got a few good recipes from friends for a good taco filling. 

Sherry was my favorite newlywed friend. We both had only 2 kids and we hung out as stay-at-home moms together, going to the park or shopping at the mall. She has since moved to Northern California and I to Utah, but once upon a time we were very good buds. 

She used to invite us over for dinner and she was an excellent, gourmet cook. She taught me to put a packet of taco seasoning in with a small jar of green chili salsa to my ground beef. It was so easy but soooo good! 

This is the way I like my Crockpot Chicken Tacos…..with corn tortillas and cilantro along with traditional toppings.
Well, now I’ve tried lots of other taco recipes, and this chicken taco recipe is super duper easy and yummy…my kind of cooking.  Here is the recipe…..I hope you like it too! 
 Chicken Tacos using flour tortillas and some avocado, sour cream and peppers for toppings….. My hub’s favorite. 

 Crockpot Chicken Tacos Ingredients 

1 envelope of Taco Seasoning
5 to 6 pieces Boneless, Skinless Chicken Breasts
1 16-ounce jar Salsa 

1 small can green chiles (diced up)

Directions: 
Dump everything into a crock pot no water needed. Cook on high for 4 to 6 hours or on low for 6 to 8 hours. When done, the chicken should shred easily when stirred with a fork. It is even better as leftovers the next day. Sometimes when I don’t have all day I just put it in an oven baking dish on 350 for 3 hours in the oven and it’s pretty ready to shred by then. 

Use your favorite taco seasoning packet and salsa brand for these.  I just used generic salsa and it was wonderful. I have heard that Paul Newman’s Own salsa is great for these tacos too. Maybe Mango Salsa if you want to try
a sweeter taco mix? 

The main ingredients for Chicken Tacos in a crockpot are 4 simple ones; chicken, salsa, a taco seasoning packet and green chiles. That’s pretty much it! Dump them all in a crockpot and wait for the magic!! 
I try to find the diced green chiles in the can, but these were on sale for 50 cents, so who minds chopping a
little to save a lot. These can cost up to $2.00 a can! What a savings I scored! 
2 seconds to chop them up. It’s kind of fun anyway. I feel like a real chef with my chef’s knife!

Top it with lettuce, cilantro, tomato, avocado, sour cream and cheese. They are delicious, messy and yummy. 

Here is THE BEFORE  PICTURE  of Crockpot Chicken Tacos.

 Here is the AFTER PICTURES of Crockpot Chicken Tacos topped with avocado and sour cream, cilantro and red peppers, or whatever your favorite toppings are!

The hubs likes flour tortillas and lots of avocado so here is his taco. It’s pretty massive I’d say. He likes them that way. Nice and sloppy. Messy eating means good eating, I always say! 

With the leftovers you can do a Tortilla Soup, check out my very favorite recipe HERE., or add some rice or black beans and make chicken burritos! Yum!